一、SpringBoot错误的默认页面
-
这里需要分为两种情况:
-
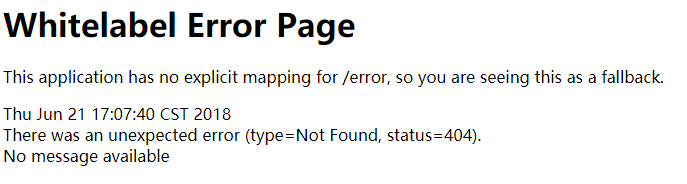
浏览器访问:

-
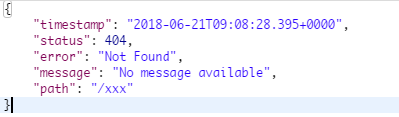
其他客户端访问:
-
为什么会出现两种情况?
- 浏览器访问时,在请求头中的Accept对应的值为text/html,所以返回的是一个错误页面
- 其他客户端访问时,在请求头的Accept对应的值为
*/*,所以返回的是一个Json数据
下面让我们来看看原理
-
二、SpringMVC错误页的自动配置类 ErrorMvcAutoConfiguration
-
类声明如下:
1
2
3
4
5
6
7
8
(type = Type.SERVLET)
({ Servlet.class, DispatcherServlet.class })
@AutoConfigureBefore(WebMvcAutoConfiguration.class)
@EnableConfigurationProperties({ ServerProperties.class, ResourceProperties.class })
public class ErrorMvcAutoConfiguration {
} -
我们主要来看这几个方法和内部类
- errorAttributes方法
-
方法的代码如下:
1
2
3
4
5
(value = ErrorAttributes.class, search = SearchStrategy.CURRENT)
public DefaultErrorAttributes errorAttributes() {
return new DefaultErrorAttributes(this.serverProperties.getError().isIncludeException());
}该方法返回一个DefaultErrorAttributes对象,并注册到Spring容器中。下面我们来看看DefaultErrorAttributes对象的getErrorAttributes方法
-
DefaultErrorAttributes对象的getErrorAttributes方法
1
2
3
4
5
6
7
8
9
10
public Map<String, Object> getErrorAttributes(WebRequest webRequest,
boolean includeStackTrace) {
Map<String, Object> errorAttributes = new LinkedHashMap<>();//错误属性map
errorAttributes.put("timestamp", new Date());//时间戳,见上面错误页
addStatus(errorAttributes, webRequest);//状态码
addErrorDetails(errorAttributes, webRequest, includeStackTrace);//错误详情
addPath(errorAttributes, webRequest);//访问的路径
return errorAttributes;
}以上就是我们看到错误页面的提示内容,返回的JSON错误信息提示也是如此。
- basicErrorController方法
-
方法代码如下:
1
2
3
4
5
6
(value = ErrorController.class, search = SearchStrategy.CURRENT)
public BasicErrorController basicErrorController(ErrorAttributes errorAttributes) {
return new BasicErrorController(errorAttributes, this.serverProperties.getError(),
this.errorViewResolvers);
}和errorAttributes方法一样,返回一个BasicErrorController对象,并加入到Spring容器中,下面我们看看BasicErrorController是什么
-
BasicErrorController
1
2
3
4
5
6
7
8
9
10
11
12
13
14
15
16
17
18
19
20
21
22
23
24
25
26
27
28
29
30
31
32
33
34
35
36
37
38
39
40
41
42
43
44
45
46
47
48
49
50
51
52
53
54
55
56
57
58
59
60
61
62
("${server.error.path:${error.path:/error}}")
public class BasicErrorController extends AbstractErrorController {
private final ErrorProperties errorProperties;
public BasicErrorController(ErrorAttributes errorAttributes,
ErrorProperties errorProperties) {
this(errorAttributes, errorProperties, Collections.emptyList());
}
public BasicErrorController(ErrorAttributes errorAttributes,
ErrorProperties errorProperties, List<ErrorViewResolver> errorViewResolvers) {
super(errorAttributes, errorViewResolvers);
Assert.notNull(errorProperties, "ErrorProperties must not be null");
this.errorProperties = errorProperties;
}
public String getErrorPath() {
return this.errorProperties.getPath();
}
(produces = "text/html")
public ModelAndView errorHtml(HttpServletRequest request,
HttpServletResponse response) {
HttpStatus status = getStatus(request);//获取状态码
//调用上面的getErrorAttributes方法获取错误属性
Map<String, Object> model = Collections.unmodifiableMap(getErrorAttributes(
request, isIncludeStackTrace(request, MediaType.TEXT_HTML)));
response.setStatus(status.value());
ModelAndView modelAndView = resolveErrorView(request, response, status, model);//解析错误视图
return (modelAndView != null ? modelAndView : new ModelAndView("error", model));
}
public ResponseEntity<Map<String, Object>> error(HttpServletRequest request) {
//调用上面的getErrorAttributes方法获取错误属性
Map<String, Object> body = getErrorAttributes(request,
isIncludeStackTrace(request, MediaType.ALL));
HttpStatus status = getStatus(request);//获取状态码
return new ResponseEntity<>(body, status);//序列化为JSON
}
protected boolean isIncludeStackTrace(HttpServletRequest request,
MediaType produces) {
IncludeStacktrace include = getErrorProperties().getIncludeStacktrace();
if (include == IncludeStacktrace.ALWAYS) {
return true;
}
if (include == IncludeStacktrace.ON_TRACE_PARAM) {
return getTraceParameter(request);
}
return false;
}
protected ErrorProperties getErrorProperties() {
return this.errorProperties;
}
}BasicErrorController本质上也是一个Controller,他映射的地址是
/error,所以有/error请求,就会来到这个Controller,观察errorHtml方法,发现他使用@RequestMapping(produces = "text/html")标注,即我们的accept为text/html时会来到这个方法,而这个方法组装错误提示后,返回视图。而accept不是text/html时,会来到error这个方法,组装提示信息后,返回JSON。
- errorPageCustomizer方法
-
方法源码如下:
1
2
3
4
public ErrorPageCustomizer errorPageCustomizer() {
return new ErrorPageCustomizer(this.serverProperties);
}方法返回一个ErrorPageCustomizer对象,并把这个对象注册到Spring容器中。下面我们看看这个对象registerErrorPages方法
-
ErrorPageCustomizer.registerErrorPages()
1
2
3
4
5
6
7
8
public void registerErrorPages(ErrorPageRegistry errorPageRegistry) {
//新建一个错误页,path是/error
ErrorPage errorPage = new ErrorPage(this.properties.getServlet().getServletPrefix()
+ this.properties.getError().getPath());
//添加错误页。
errorPageRegistry.addErrorPages(errorPage);
}因上,于是乎,只要服务器出现错误,都会访问
/error这个请求。这是由web.xml注册的错误页规则所定,而BaseErrorController专门负责拦截这个请求,然后通过Accept来判断不同的客户端,已达到返回不同的结果的效果。
- DefaultErrorViewResolverConfiguration内部类
-
类的源码如下;
1
2
3
4
5
6
7
8
9
10
11
12
13
14
15
16
17
18
19
20
static class DefaultErrorViewResolverConfiguration {
private final ApplicationContext applicationContext;
private final ResourceProperties resourceProperties;
DefaultErrorViewResolverConfiguration(ApplicationContext applicationContext,
ResourceProperties resourceProperties) {
this.applicationContext = applicationContext;
this.resourceProperties = resourceProperties;
}
(DispatcherServlet.class)
@ConditionalOnMissingBean
public DefaultErrorViewResolver conventionErrorViewResolver() {
return new DefaultErrorViewResolver(this.applicationContext,this.resourceProperties);
}
}DefaultErrorViewResolverConfiguration只有一个conventionErrorViewResolver方法需要我们看下,通过字面意思理解,这个方法是返回一个默认的错误视图解析器。那么我们来看看这个解析器的resolveErrorView方法 -
DefaultErrorViewResolver.resolveErrorView
1
2
3
4
5
6
7
8
9
10
11
12
13
14
15
16
17
18
19
20
21
22
23
public ModelAndView resolveErrorView(HttpServletRequest request, HttpStatus status,
Map<String, Object> model) {
ModelAndView modelAndView = resolve(String.valueOf(status), model); //调用下面的方法进行解析
if (modelAndView == null && SERIES_VIEWS.containsKey(status.series())) {
modelAndView = resolve(SERIES_VIEWS.get(status.series()), model);
}
return modelAndView;
}
private ModelAndView resolve(String viewName, Map<String, Object> model) {
//根据上面的调用,viewName值为错误码。如果是404,则为error/404.html
String errorViewName = "error/" + viewName;
//如果模板引擎可以解析这个页面地址就用模板引擎解析
TemplateAvailabilityProvider provider = this.templateAvailabilityProviders
.getProvider(errorViewName, this.applicationContext);
if (provider != null) {
//模板引擎可用的情况下返回到errorViewName指定的视图地址
return new ModelAndView(errorViewName, model);
}
//模板引擎不可用,就在静态资源文件夹下找errorViewName对应的页面 error/404.html
return resolveResource(errorViewName, model);
}
-
错误页步骤
-
一但系统出现4xx或者5xx之类的错误;ErrorPageCustomizer就会生效(定制错误的响应规则),发送
/error请求 -
请求被
BaseErrorController拦截。根据客户端类型,来判断返回视图。 -
如果静态资源文件夹下找不到,则会创建一个ModelAndView(“error”)的视图。
-
在
ErrorMvcAutoConfiguration类中,有如下配置。配置了error模版1
2
3
4
5
6
7
8
9
10
11
12
13
14
15
16
17
18
19
20
21
22
23
24
25
26
27
28
29
(prefix = "server.error.whitelabel", name = "enabled", matchIfMissing = true)
(ErrorTemplateMissingCondition.class)
protected static class WhitelabelErrorViewConfiguration {
//这就是error模版,上面的错误页面内容就是这里的。
private final SpelView defaultErrorView = new SpelView(
"<html><body><h1>Whitelabel Error Page</h1>"
+ "<p>This application has no explicit mapping for /error, so you are seeing this as a fallback.</p>"
+ "<div id='created'>${timestamp}</div>"
+ "<div>There was an unexpected error (type=${error}, status=${status}).</div>"
+ "<div>${message}</div></body></html>");
//返回error视图
(name = "error")
(name = "error")
public View defaultErrorView() {
return this.defaultErrorView;
}
//添加BeanName视图解析器,加在这里是为了避免我们在类声明处加上 @EnableWebMvc 注解,
//从而使SpringMVC的自动配置不生效,而且又忘了配置BeanNameViewResolver的情况
public BeanNameViewResolver beanNameViewResolver() {
BeanNameViewResolver resolver = new BeanNameViewResolver();
resolver.setOrder(Ordered.LOWEST_PRECEDENCE - 10);
return resolver;
}
}
-
三、自定义我们自己的错误页
上面介绍了SpringBoot错误页的原理。那么接下来我们就着手定制我们自己的错误页。
-
定制错误页面
根据上面的分析,我们知道如果有模版解析器,会转到对应的模版解析器中去处理,如果没有的话就会在静态资源路径下去找对应的
状态码.html页面 ,再没有的话就会应用默认的页面。那么我们可以这样来定制我们的错误页面- 有模版解析器,就把错误页(
状态码.htlm)放入到resources/templates下面。我们可以使用4xx.html、5xx.html来匹配所有4和5开头的错误码。但是优先会寻找准确的。比如同一个目录下有400.html和4xx.html优先显示的是400.html中的内容 - 没有模版解析器,则可以把自定义错误页面放到静态资源路径下。
- 页面能够获取的属性如下:
- timestamp:时间戳
- status:状态码
- error:错误提示
- exception:异常对象
- message:异常消息
- errors:JSR303数据校验的错误都在这里
- 有模版解析器,就把错误页(
-
定制错误JSON
-
自定义异常处理&返回定制json数据(没有自适应效果)
1
2
3
4
5
6
7
8
9
10
11
12
13//@ControllerAdvice 具体可参考 https://blog.csdn.net/w372426096/article/details/78429141
public class MyExceptionHandler {
//异常处理器,UserNotExistException是自己写的异常类,此注解的作用是当出现其定义的异常时,进行处理方法
(UserNotExistException.class)
public Map<String,Object> handleException(Exception e){
Map<String,Object> map = new HashMap<>();
map.put("code","user.notexist");
map.put("message",e.getMessage());
return map;
}
} -
转发到/error进行自适应响应效果处理
1
2
3
4
5
6
7
8
9
10
11
12
13
14(UserNotExistException.class)
public String handleException(Exception e, HttpServletRequest request){
Map<String,Object> map = new HashMap<>();
//传入我们自己的错误状态码 4xx 5xx,否则就不会进入定制错误页面的解析流程
/**
* Integer statusCode = (Integer) request
.getAttribute("javax.servlet.error.status_code");
*/
request.setAttribute("javax.servlet.error.status_code",500);
map.put("code","user.notexist");
map.put("message",e.getMessage());
//转发到/error
return "forward:/error";
} -
如何携带我们自己定义的数据
经过上面的分析,我们已经知道,出现错误以后,会来到
/error请求,会被BasicErrorController处理,响应出去可以获取的数据是由DefaultErrorAttributes.getErrorAttributes得到的。我们来看DefaultErrorAttributes的声明1
2
3
4
5
6
//当容器中没有ErrorAttributes这个Bean是才会去创建。
(value = ErrorAttributes.class, search = SearchStrategy.CURRENT)
public DefaultErrorAttributes errorAttributes() {
return new DefaultErrorAttributes(this.serverProperties.getError().isIncludeException());
}那么,我们是否可以继承
DefaultErrorAttributes这个类,来 定义一个自己的类,用于自定义数据的返回呢?答案是肯定的。源码如下:1
2
3
4
5
6
7
8
9
10
11//给容器中加入我们自己定义的ErrorAttributes
public class MyErrorAttributes extends DefaultErrorAttributes {
public Map<String, Object> getErrorAttributes(RequestAttributes requestAttributes, boolean includeStackTrace) {
Map<String, Object> map = super.getErrorAttributes(requestAttributes, includeStackTrace);
map.put("blog","zyzl.github.io");
return map;
}
}最终的结果是,响应是自适应的,而且响应也有我们自己定义的数据。
分析完毕,谢谢大家观看!
-